Installing an HVAC (Heating, Ventilation, and Air Conditioning) system in a new house or building is a complicated process that will take many factors into consideration. Depending on local regulations, it may also be a requirement for HVAC installation to be handled by licensed HVAC professionals who have undergone thorough training.
However, if you are interested in learning more about the process of HVAC installation, whether you want to do some maintenance on your current system or would like to have a better understanding of what to expect throughout the installation process, keep reading for a detailed, step-by-step guide to HVAC installation.
HVAC Installation for New Construction
HVAC installation for new construction involves several phases that are rather detailed in nature, but these can generally be carried out in a relatively short period of time when handled by experienced professionals.
Depending on the size of the new construction, the number of people on the HVAC installation team, and climate considerations, the entire process can be completed in around three to five days from start to finish.
Planning
Before beginning the HVAC installation, an HVAC professional will need to visit the site to see the layout of the construction in person and take thorough measurements to plan the positioning of the ductwork.
The planning portion of the HVAC installation process is one of the most important steps because this will determine the overall efficiency of your HVAC system, and it will make a big difference in the final price tag for completing the job.
When mapping out ductwork around the house, your HVAC technician will need to strategically plan where supply and return ducts will go to reduce the distance your hot and cold air will have to travel. The farther the air needs to travel, the less efficient the system will be. Also, it is ideal to keep turns and bends to a minimum to reduce obstructions in the airflow. This will keep your warm and cool air moving freely around the house while optimizing temperature regulation.
Thoroughly planning your ductwork will also reduce temperature variations from room to room. You have probably lived somewhere that had a room or area that was never hot or cold enough, even though the rest of the house was comfortable. This can be a result of a few different factors, such as thermostat placement and airflow efficiency.
An HVAC thermostat needs to be placed in a central location within the home to ensure it gets a reading that accurately reflects the temperature throughout the building. For example, if you were to put the thermostat in a room that is close to your heater, then it will be among the first areas to receive warm air from the supply duct. This will cause the room to warm up more quickly than other areas of the home, and when the thermostat reads that the room has reached the set temperature, it will turn off the HVAC system before it is able to adequately heat or cool other areas of the house.
One way to mitigate this issue is by placing dampers in strategic areas throughout the home. Dampers are devices that are placed inside your new construction’s ductwork to regulate the flow of air throughout the home. There are several different types of dampers, but the most commonly used style of dampers in homes is known as “balancing dampers.”
These dampers are installed at branch points within larger ducts to control the volume of air moving to certain areas. For example, if there is a branch in your ductwork that conveys air movement to a smaller area, your HVAC technician will install a balancing damper at this branch to reduce the amount of air flowing to this room in order to prevent it from being too hot or too cold.
Some homes also have HVAC systems that are referred to as being “zoned.” A zoned HVAC system will have individual thermostats in different locations, along with a central control panel for the entire system. This allows the HVAC system to maintain separate temperatures among different areas of the house or building. Zone damper systems will generally be motorized in order to adjust for the individual temperatures set on each thermostat.
Another important consideration for planning the ductwork of an HVAC system is the location of supply and return points. Experienced HVAC technicians will have a thorough understanding of how air tends to circulate within a home, and they will place supply and return points accordingly.
In case you are unfamiliar with these terms, the supply is where the hot or cold air comes out to control the temperature within the room or area, and the return is where the air is drawn back into the HVAC system from the conditioned spaces.
The return system in HVAC plays a crucial role in ensuring that the system is working efficiently. When air is pulled into the return duct, this creates a negative pressure system that will help draw the conditioned air into the room, which is why you will often see supply and return points placed on opposite sides of a room.
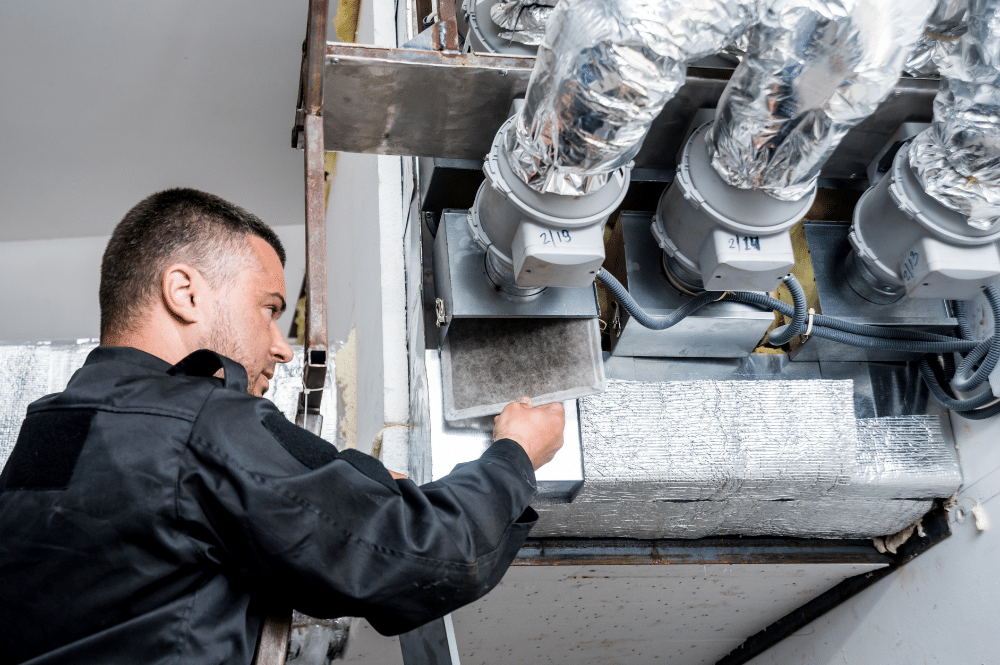
Another important function of the HVAC return system is air filtering. If you have ever removed the grille from a return duct (the metal covering with long, horizontal openings), you probably found a filter placed inside the return duct. However, if you did not find a filter here, you should install one since this will improve the performance and lifespan of your HVAC system.
HVAC return filters are used to remove moisture, dust, hair, and other particles that may be circulating within your home. By ensuring that clean, filtered air is returned to your HVAC system, you can reduce the buildup of contamination inside your ducts, heater, and air conditioning systems. When the inner components of these systems are kept clean, this will improve their performance, reduce the need for maintenance, and ensure that they last longer. This will also help to improve the quality of the air that is being distributed around your home.
Return filters are fairly inexpensive, and they should be replaced every 30 to 90 days, depending on what kind of filter you are using. The lifespan of your filter will also be affected by other factors, such as the area where you live and the quality of the filter. A good rule of thumb for an air filter is: if it looks dirty, go ahead and change it.
Along with planning the layout of your HVAC system’s ductwork, your HVAC technician will also take other factors into consideration, such as the size of your house, the climate of your region, the R-value of your insulation, and the local zoning laws and regulations.
These are all important characteristics that will determine your overall needs for HVAC installation.
Ductwork Installation
After completing the planning phase of your HVAC installation, your technician will begin by installing the ductwork throughout your new construction. This part of the process will need to be completed after your entire house is framed to provide the necessary structure for safely attaching your ductwork. This will also usually take place after the house’s electrical system and wiring have been installed.
Since ductwork is large and can take up a lot of space between the joists and studs in your floors and walls, installing ductwork after the electrical components is ideal to reduce conflicts in the two systems’ layouts. Also, having electricity will allow HVAC technicians to power up and test the HVAC system for its final configurations.
When installing ductwork, HVAC technicians will use a variety of different shapes and sizes of ducts, depending on the specific purpose and location of the ductwork. If you have ever been inside an unfinished house or basement, you’ve probably seen a combination of flat and round ducts. Ductwork can be flat, round, or oval-shaped, and there is also flexible ductwork that can be bent and molded to fit in hard-to-reach areas.
All of these options are suitable for both return and supply ducts, but return ducts are typically much larger than supply ducts.
Ductwork can also be made from a variety of different materials, such as aluminum, galvanized steel, stainless steel, and even copper. However, the most common materials used in homes are aluminum and galvanized steel.
Galvanized steel is coated with a layer of zinc to prevent corrosion, and it has excellent durability, making it a popular choice for home ductwork. Aluminum may also be used in environments where there is a higher concern for humidity since aluminum has excellent corrosion resistance, but it is not unusual to see a combination of the two materials used in a home’s HVAC installation.
While copper and stainless steel can be used in an HVAC installation, these are less common due to their higher price tag. Copper and stainless steel are typically only used in certain applications that require specific characteristics.
Ductwork will oftentimes be wrapped in insulation to prevent unwanted heat transfers, and it can also prevent condensation from forming on the outside of the ducts. Condensation can be a real problem in certain areas because it can damage other components of the home. For example, if condensation is allowed to form on a duct that is behind a piece of drywall, the water might drip onto the drywall and create water spots.
In addition to being insulated, ductwork will also need to be sealed off with duct tape wherever two pieces of duct meet. This will create an airtight fit, which will improve the overall efficiency of the system’s airflow.
System Installation
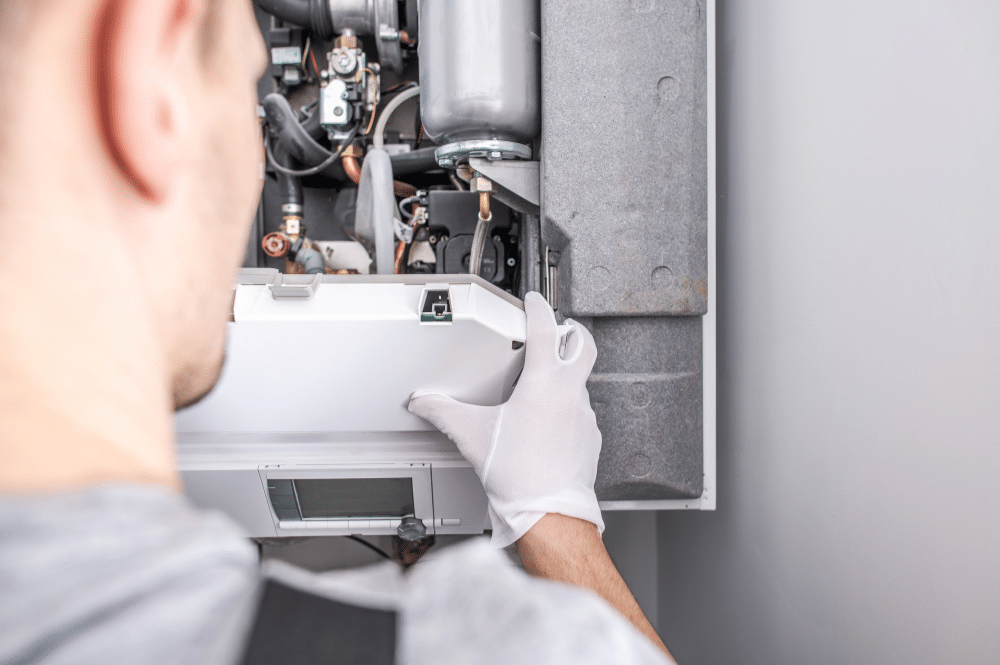
After installing the duct system, your HVAC technician will begin installing your heating and cooling systems. For home HVAC systems, heaters will always be placed indoors, and air conditioning units will have two separate components – one of which is indoors and the other outdoors.
The condenser component and exhaust fan will be outside, usually placed right next to the house, and the evaporator coil will be on top of the heater so it can send cold air to the house’s supply ducts.
Each unit’s positioning will already have been determined by your HVAC technician, and they will already have the necessary ductwork and gas lines in place to connect your heating and cooling units.
Heaters
Home heaters will usually be placed in a utility room, or in the case of an unfinished basement, it may be left in the open downstairs.
Before beginning your heating installation, it is absolutely essential to ensure that the gas and electricity are turned off. In the case of HVAC installation for new construction, these will oftentimes already be shut off for the entire house during construction, but you should still double-check. Also, if there are other crews that are actively working in the home during HVAC installation, let them know what you are doing to avoid any issues that may arise due to conflicting projects.
Heaters will always have a dedicated circuit, assuming that everything is being built to code. New construction will usually have clearly marked circuit breakers in the breaker box, but it’s still a good idea to test whether or not you have the right breaker, in case something was labeled improperly. To test the switch for your heater, you will need to remove the switch plate from your Heater’s on/off switch and use a multimeter to see if your switch is receiving power. Multimeters are inexpensive tools that are easy to use, but if you are unfamiliar with how these work, take a few minutes to watch a video on how to properly use them. If you are unable to test the switch, it’s best to turn off the electricity for the entire house.
For the gas line, there should be a valve next to the area where you will be installing the heater. Ensure that the valve is in the off position before beginning your work. The handle for the valve will be parallel to the gas line when the valve is open, and it will be perpendicular to the line when in the off position.
Once you have made sure that all of your gas and electricity supplies are off, you can begin connecting the heater to your supply and return ducts. This aspect of the HVAC installation process does require some customization, so you will need some additional materials and tools to complete this step.
First, you will need to connect your return line to the heater by cutting a hole in the side of the heater. Heaters are not manufactured with precut holes because return ducts vary in size from one house to another. Be sure to check your heater’s installation manual to ensure that you are connecting the return duct to the correct side before cutting into the sheet metal on the outside of your heater.
Inside the bottom of the heater, you will find a blower motor that pulls air into the heater and forces it up to the supply duct. Heaters come with both left and right-facing blowers to match the ductwork of the home where the heater is being installed. Another way you can ensure that the blower is facing the correct side is by removing the front cover of the heater. If your blower is not facing the same side as your return duct, you will need to swap it out for another heater with the correct orientation.
Once you have found the correct location for your return duct, cut a hole in the side of the heater that matches the size and shape of your return duct. Attaching your return duct is fairly straightforward and typically doesn’t require specialized tools. Simply butt the edges of your return duct up to the hole and seal the connection with duct tape. Also, your return duct should have an opening where you can install a new air filter periodically. Be sure to insert a filter into this space that is large enough to completely cover the opening before turning on the heater.
Next, you will need to connect your gas lines to your heater. Your heater’s gas line connections will need to be sealed using a specialized sealant since the threads are not always airtight. Apply your sealant to the threads on your gas line, then attach a flexible gas hose from your gas line valve to your heater’s gas valve.
After securely connecting your gas line to your heater’s gas valve, you will need to connect the electrical wires from your heater to your switch. Your new heater will have two wires running to the space where your switch will be installed. Match the neutral (white) wires, and connect them using a wire nut or some other form of electrical connection. Also, make sure the ground wire (green) is connected to the ground screw inside the switch box. Once your neutral and ground wires are connected, attach the live wire (black) to your switch by wrapping it around the screw on the side of the switch, then do the same with the black wire from the heater. When the switch is flipped, the circuit will be completed between the two black wires, and your heater will be able to power on.
Once your main power supply is connected, you will need to connect the thermostat wires to your heater’s circuit board. Before completing this step, you will need to reference the wiring diagram from your installation instructions. There will be wires for the thermostat and the AC’s condensing unit, so be sure to carefully check that each of these is connected to the correct terminal on the circuit board.
After your electrical connection is finished, you will need to connect the ductwork to the top of your heater. However, for most home HVAC installations, the evaporator coil for your AC will go on top of the heater, so you may need to hold off on completing this last step.
Attaching the ductwork requires some customization, and you will want to measure carefully before cutting and placing the walls to your duct connection. There are a few different ways to go about this, but the most important part of this step is ensuring an airtight fit. You will typically connect the upper portion with a piece of S channel, and the lower portion will be screwed directly into the top of the heater or evaporator coil box. Once your ductwork is connected, seal everything off with duct tape.
After your heater installation is complete, you will need to check the gas and air pressure for your system. This process can require some specialized tools, so it is best to reference your installation instructions to see the manufacturer’s recommendations. It may be best to leave this part to a professional to make sure your system is running correctly.
Air Conditioning
Before installing your air conditioning system, you will need to remove the panel above the gas lines on the outdoor unit. The outdoor unit consists of two primary parts. First, there is a condenser unit that compresses and condenses the refrigerant. Second, there is a fan that helps remove the excess heat that is created when the refrigerant is compressed.
Inside the panel above the gas valves, you will find the electrical connections to power the unit. Be sure to check your manufacturer’s installation instructions for where to place the ground wire and electrical wires, but this process is fairly straightforward and should be easy to complete. After connecting your electrical wires, you will also need to connect your thermostat wires.
Once all of your wiring is in place, you will need to solder your gas lines. There will be two gas lines – one large and one small. After you solder these to the corresponding gas valves on the outdoor unit, your outdoor installation will be complete. It is important that you keep the valves closed until the full installation is complete.
In most cases with new air conditioning units, the system will come pre charged with refrigerant. Since you have only finished half of your installation, your gas lines are not yet sealed. Before opening the valves, you will need to install the evaporator coil above your heater.
To install your evaporator coil, you will need to place it above the heating unit. In the case of new construction, your supply ducts should have already taken this into account, leaving you enough room to install your evaporator coil above your heater.
Your evaporator will come with a metal box that sits on top of your heater, and this will need to be secured on top of the heater using self-tapping screws. After it is screwed down, you will need to connect the top of the box using a similar method to the one we described when talking about connecting your heater to the supply duct.
You will want to seal off the inside joints using a combination of duct tape and duct sealant. After taping off the joints with duct tape, apply duct sealant with a paintbrush and allow it to dry.
Once your evaporator box is connected to the duct, you can insert the evaporator coil and replace the front panel. After your front panel is replaced, you can solder the gas lines that run from your outdoor unit to the evaporator coil.
Now that everything is installed, you can return to the outdoor unit to open the gas valves, allowing the refrigerant to move throughout the air conditioning system. The system can then be powered on, but you may need to perform some additional fine-tuning to make sure the system is running correctly.
Keep in mind when reading this article that these steps will be fairly consistent across most HVAC installations, but there may be some additional steps that will be specific to the heating/cooling units you are installing. Also, if you are not familiar with the materials and tools involved in the HVAC installation process, it may be better to leave your heating and cooling needs to a professional.
Schneider Mechanical HVAC Installation
Schneider Mechanical is a family-owned and operated HVAC installation company in Texas, servicing Austin and all other surrounding areas. Whether you are building a new home or business, or you just need some maintenance for your existing system, Schneider Mechanical is here to help.
We take pride in providing honest service, and we will never try to sell you a product or service that you don’t need.
Give us a call to schedule an appointment with one of our experienced HVAC technicians!